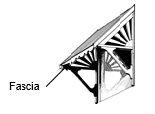
Window canopy kits are made from LOSP pressure treated pine.
Kit contents
- 2 x pre-assembled canopy end frames (1 left and 1 right)
- 3 x battens for fixing iron
- Precut ripple iron for straight roofed models
- Pre-cut custom orb for arched roof
- 1 x shaped fascia board
- 2 x sets timber end caps
- Assembly screws:
-
- 4 large coach screws and washers for mounting wall brackets
- 12 color matched roofing screws for every 2 metres of colourbond iron
- 6 x 50mm screws for fixing battens
- 4 x 30mm screws for fixing end caps
- 4 x 25mm screws for fixing fascia board
Assembly Instructions
Skill Level:Experienced DIY
Equipment required:
- Drill
- Phillips head screw driver
- Saw to cut battens to length
- Tape measure or ruler
- Pencil
- Square
Assembly:
- It is highly recommended that all timber components be primed with an oil based paint before assembly. This is a requirement for the Osmose gurantee.
- Locate and mark studs either side of the window (approx 50mm -150mm from window edges)Mark the height where the canopy will sit above the window.
 Mark the height where the canopy will sit above the window.
- Using 2 coach screws fix the left canopy frame to wall using stud and height marking. Ensure the frame is vertically straight.
- Repeat step 3 on the right side of the window using the right canopy frame.
- Cut 3 battens to length i.e. the distance from the outer edge of the left canopy frame to the outside edge of the right canopy frame.
- Using 50mm screws fix the battens to the top of the frames positioning as follows
1st batten across the top of the 2 brackets
2nd batten across the middle
3rd batten across the bottom
-
Cut the fascia board to length i.e. from outer edge of the face of the left wall bracket to the outer edge of the face of the right wall bracket.
-
Fix fascia board to front of the wall brackets with 25mm screws.
-
 Place the iron on top of the battens with the gullies running. Fix to battens with coloured screws.
 -
Position the left end cap flashing on top of the iron with the smaller edge sitting on the iron. The end will be flush against the wall. Fix using 30mm screws.
-
Repeat step 7 with the right end cap flashing
